Día triste. Hoy más que nunca, lágrimas. Otro grande que se va. Descansa en paz, Bebo.
3.2.13
Cambio de aspecto
Segundo cambio de look del blog. Bastante menos barroco que antes y con algún nuevo truco CSS que he encontrado aquí. Se aceptan sugerencias :)
Y ya de paso conviene recordar el anterior, creo que el cambio ha ido a mejor.
Y ya de paso conviene recordar el anterior, creo que el cambio ha ido a mejor.
9.1.13
Hidromiel: Primer intento
Algo nuevo que contar. Mi primer intento de hacer hidromiel casera, receta sencilla y de momento sólo medio litro, para probar. Por mi cuenta de Twitter iré marcando algún que otro hito de la evolución del brebaje :)
La receta para una primera prueba, relativamente sencilla (en gris los puntos a los que todavía no he llegado):
La receta para una primera prueba, relativamente sencilla (en gris los puntos a los que todavía no he llegado):
Ingredientes y utensilios
Preparación
Se calienta el agua y una vez caliente se mezcla la miel dentro hasta que quede una mezcla homogénea. Se deja en el fuego hasta que empiece a hervir y entonces se retira. Se espera que se enfríe a temperatura entre 25-30 ℃ (este paso es importante, no se puede echar la levadura en caliente porque se morirían los hongos). En cuanto baje a esa temperatura se desmenuza bien la levadura (que quede casi en polvo) y se mezcla dentro del líquido. Una vez tengamos la mezcla, se echa en la botella con un embudo. Aquí viene un paso que me ha recomendado @mldelpueyo: es bueno oxigenar la mezcla un poco, así que con la mezcla dentro de la botella la agitamos para que coja algo de aire.
Fermentación
Ahora la mezcla ha de fermentar. No queremos que el aire entre en la botella, pero la fermentación producirá CO2, así que éste tendrá que salir de algún modo. Para eso está el globo. Pinchando un par de veces el globo con la aguja y colocándolo en el cuello de la botella, conseguiremos que cuando se produzca mucho CO2 éste infle el globo, se expandan los agujeros y salga. Sin embargo, mientras el globo esté desinflado el aire de fuera no entrará. Es una versión casera de una válvula de escape. Por si acaso se produce demasiado aire (aunque lo dudo), para que no salga el globo volando lo he agarrado con celo al cuello de la botella. El tiempo de fermentación he leído que son 3 semanas a 25-30 ℃ aunque como esas temperaturas no se alcanzan en una casa normal en invierno, imagino que tardará más.
Clarificación
Una vez haya fermentado por completo, ya tendremos (o eso espero) la hidromiel y lo único que quedará es "colar" la mezcla para que no queden posos. Esto es fácil de hacer con el truco de la gasolina. Colocar otra botella de cristal a una altura menor, unir con un tubo de goma una botella a otra (aspirar la hidromiel para que llegue al extremo inferior del tubo) y la gravedad hará el resto.
- 0,5 litros de agua (mineralización muy débil)
- 160 gramos de miel (la normal de Carrefour)
- Menos de 1 gramo de levadura natural (la que se guarda en la nevera que venden en tacos)
- Una cacerola pequeña
- Un globo
- Una botella (preferiblemente de cristal)
- Una aguja fina
- Algo de celo o cinta aislante
Preparación
Se calienta el agua y una vez caliente se mezcla la miel dentro hasta que quede una mezcla homogénea. Se deja en el fuego hasta que empiece a hervir y entonces se retira. Se espera que se enfríe a temperatura entre 25-30 ℃ (este paso es importante, no se puede echar la levadura en caliente porque se morirían los hongos). En cuanto baje a esa temperatura se desmenuza bien la levadura (que quede casi en polvo) y se mezcla dentro del líquido. Una vez tengamos la mezcla, se echa en la botella con un embudo. Aquí viene un paso que me ha recomendado @mldelpueyo: es bueno oxigenar la mezcla un poco, así que con la mezcla dentro de la botella la agitamos para que coja algo de aire.
Fermentación
Ahora la mezcla ha de fermentar. No queremos que el aire entre en la botella, pero la fermentación producirá CO2, así que éste tendrá que salir de algún modo. Para eso está el globo. Pinchando un par de veces el globo con la aguja y colocándolo en el cuello de la botella, conseguiremos que cuando se produzca mucho CO2 éste infle el globo, se expandan los agujeros y salga. Sin embargo, mientras el globo esté desinflado el aire de fuera no entrará. Es una versión casera de una válvula de escape. Por si acaso se produce demasiado aire (aunque lo dudo), para que no salga el globo volando lo he agarrado con celo al cuello de la botella. El tiempo de fermentación he leído que son 3 semanas a 25-30 ℃ aunque como esas temperaturas no se alcanzan en una casa normal en invierno, imagino que tardará más.
Clarificación
Una vez haya fermentado por completo, ya tendremos (o eso espero) la hidromiel y lo único que quedará es "colar" la mezcla para que no queden posos. Esto es fácil de hacer con el truco de la gasolina. Colocar otra botella de cristal a una altura menor, unir con un tubo de goma una botella a otra (aspirar la hidromiel para que llegue al extremo inferior del tubo) y la gravedad hará el resto.
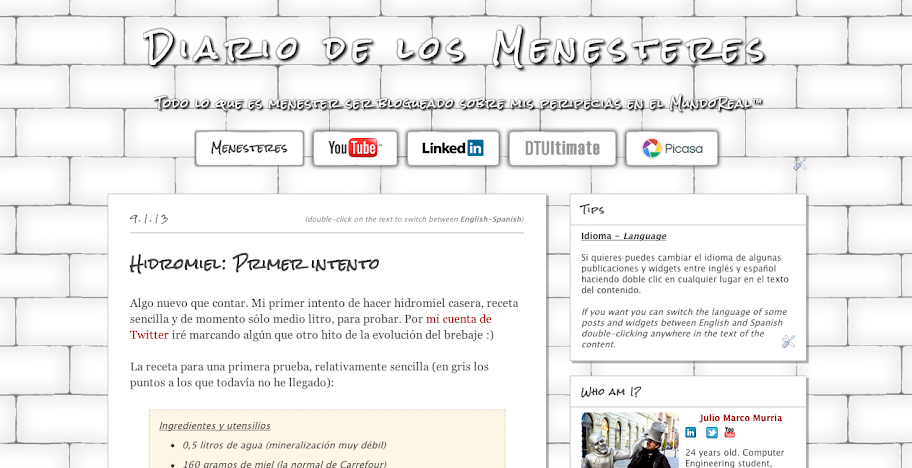
DÍA 1 (08.01.2013)
Pasos iniciales hasta colocar el globo pinchado. Éste es el resultado instagrameado:
Pasos iniciales hasta colocar el globo pinchado. Éste es el resultado instagrameado:
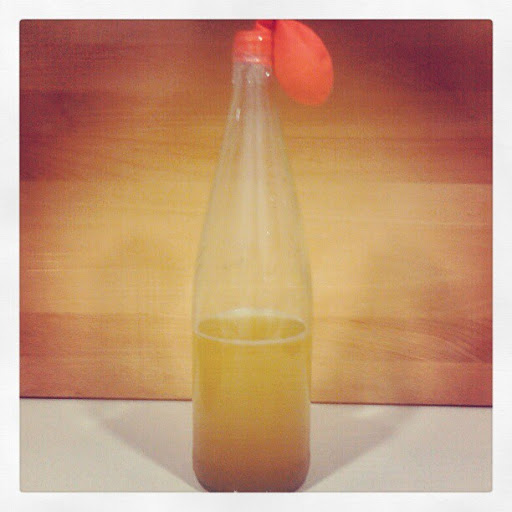
DÍA 2 (09.01.2013)
Cambio la hidromiel a una botella más pequeña.

Cambio la hidromiel a una botella más pequeña.
DÍA 5 (12.01.2013)
Medio litro más, esta vez con un poco de sabor vainilla.

Medio litro más, esta vez con un poco de sabor vainilla.
DÍA 19 (26.01.2013)
En la primera botella que puse los posos ya están en el fondo por completo. La segunda lleva 4 días menos y todavia flotan un poco.
En la primera botella que puse los posos ya están en el fondo por completo. La segunda lleva 4 días menos y todavia flotan un poco.
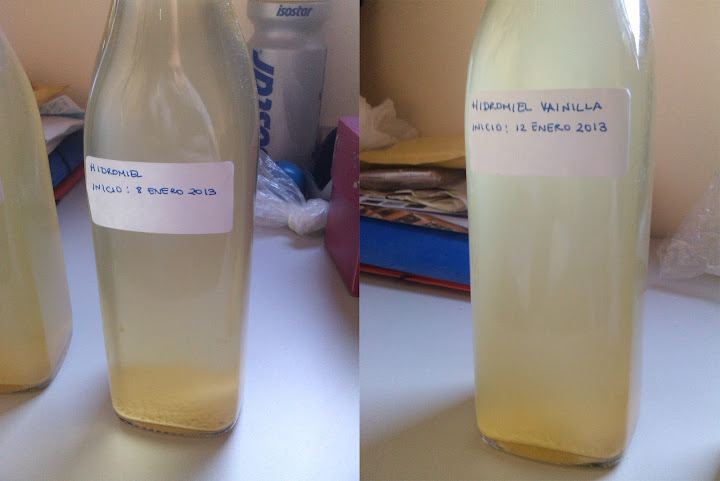
DÍA 48 (22.02.2013)
La primera botella ha dejado de sacar bastante gas (basta con desinflar el globo y esperar una noche a ver si vuelve a inflarse), así que decido abrirla y quitar los posos trasvasándola con el tubo. Ha costado bastante mas de lo esperado que deje de sacar gas (más del doble de tiempo), pero parece que ya está lista para beber :) El veredicto probándola con mis amigos: el alcohol se nota, pero sabe poco a miel. La próxima habrá que echar un poco más y probablemente usar una miel mejor.


La primera botella ha dejado de sacar bastante gas (basta con desinflar el globo y esperar una noche a ver si vuelve a inflarse), así que decido abrirla y quitar los posos trasvasándola con el tubo. Ha costado bastante mas de lo esperado que deje de sacar gas (más del doble de tiempo), pero parece que ya está lista para beber :) El veredicto probándola con mis amigos: el alcohol se nota, pero sabe poco a miel. La próxima habrá que echar un poco más y probablemente usar una miel mejor.
Suscribirse a:
Entradas
(
Atom
)